Key Takeaways
- Block internet access for apps collecting data or spamming to protect your privacy.
- Use NetGuard app to restrict internet access for specific apps without root access easily.
- NetGuard offers features like lockdown mode, system app blocking, and fine-tuned customization for effective firewall setup.
It may not seem like it these days, but not every app needs internet access to work. Malicious apps can mine your device for data or spam you with ads. Happily, there’s an easy fix for these troublemakers—just block their internet access. Here’s how you can do that.
Why Should You Restrict Internet Access for Specific Apps
Apps that have unrestricted access to the internet in the background have the ability to collect and sell your personal data. Your location history, device ID, browsing history, and contact info are all up for grabs.
They could also be using your network to spam you with ad walls or useless notifications. Free games and utility apps often do that a lot. If you want to force any app into offline mode without disconnecting your Wi-Fi or data, you can simply cut off its internet. And sometimes, you may just want to lock down social media apps to stop your doomscrolling.
You can do all that (and more) with a simple firewall app. It strengthens your privacy and keeps away invasive ads. Plus, you save mobile data and stop apps from leaking your information.
How Does Network Firewall Work on Android
Sadly, Android doesn’t have a native firewall service. There are plenty of third-party firewall options out there, but most of them require root access. One good firewall app that works flawlessly without root is NetGuard. It’s free, open source, and the developer regularly maintains and supports it.
NetGuard has a simple, easy-to-use interface that doesn’t sacrifice features. With two simple taps, you can turn off the Wi-Fi or data access for any app. You can also configure NetGuard to block Wi-Fi, data, or both by default. That way, the app will restrict all pre-installed and newly installed apps until you manually allow them.
It features a lockdown mode too, that blocks all internet traffic, except the apps that you’ve placed on the lockdown allowlist. It’s a neat little feature for when you want to save battery or when you’re almost out of data.

You can even set up rules like only allowing apps to access data or Wi-Fi while the screen is turned on. NetGuard works by routing and filtering internet traffic through the local Android VPN service. Remember that it’s just a firewall, not a VPN. It only uses the VPN service to make the firewall work without root. The firewall sends all the traffic from a blocked app to a VPN “sinkhole,” effectively cutting it off from the internet. That’s why the app in action will appear as a VPN—you’ll see a persistent notification and a VPN icon on the status bar as long as NetGuard runs.
The app itself uses very little memory and battery. But you’ll notice that it has a big data usage footprint. That’s because Android mistakes the traffic routed through NetGuard as the app’s usage.
How to Create a Network Firewall on Android
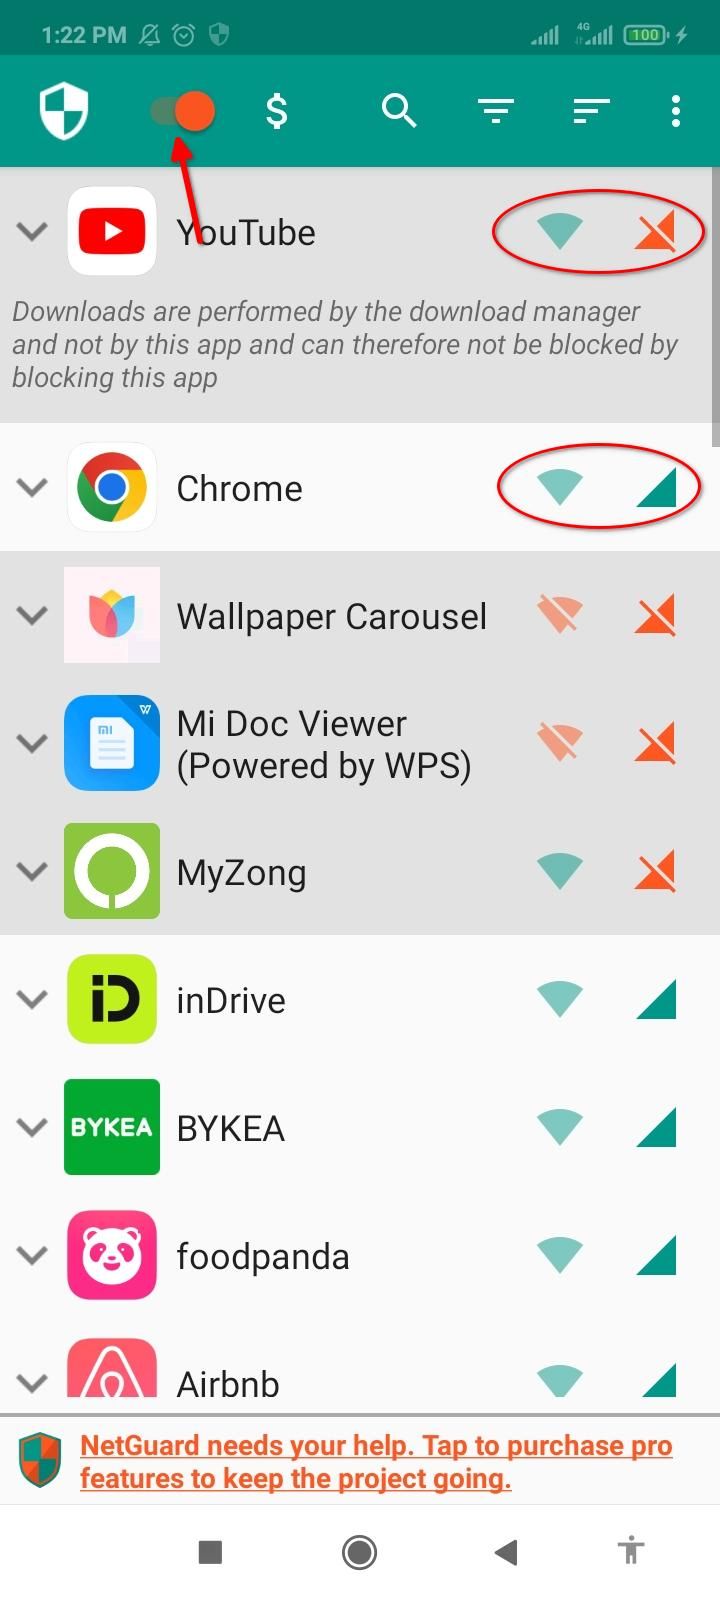
To set up the NetGuard firewall, first download NetGaurd from the Google Play Store. Accept the privacy policy after installing to continue. NetGuard has a pretty simple UI. The toggle on the top corner is the master switch for enabling and disabling the firewall.
Next to the master switch, you’ll find a list of all your apps. Each app has Wi-Fi and data icons next to it. Tapping one or both of these icons will turn them orange. A teal icon means the app has internet access; orange means it’s blocked. That’s how you can selectively allow or block access for any app or combination of apps.

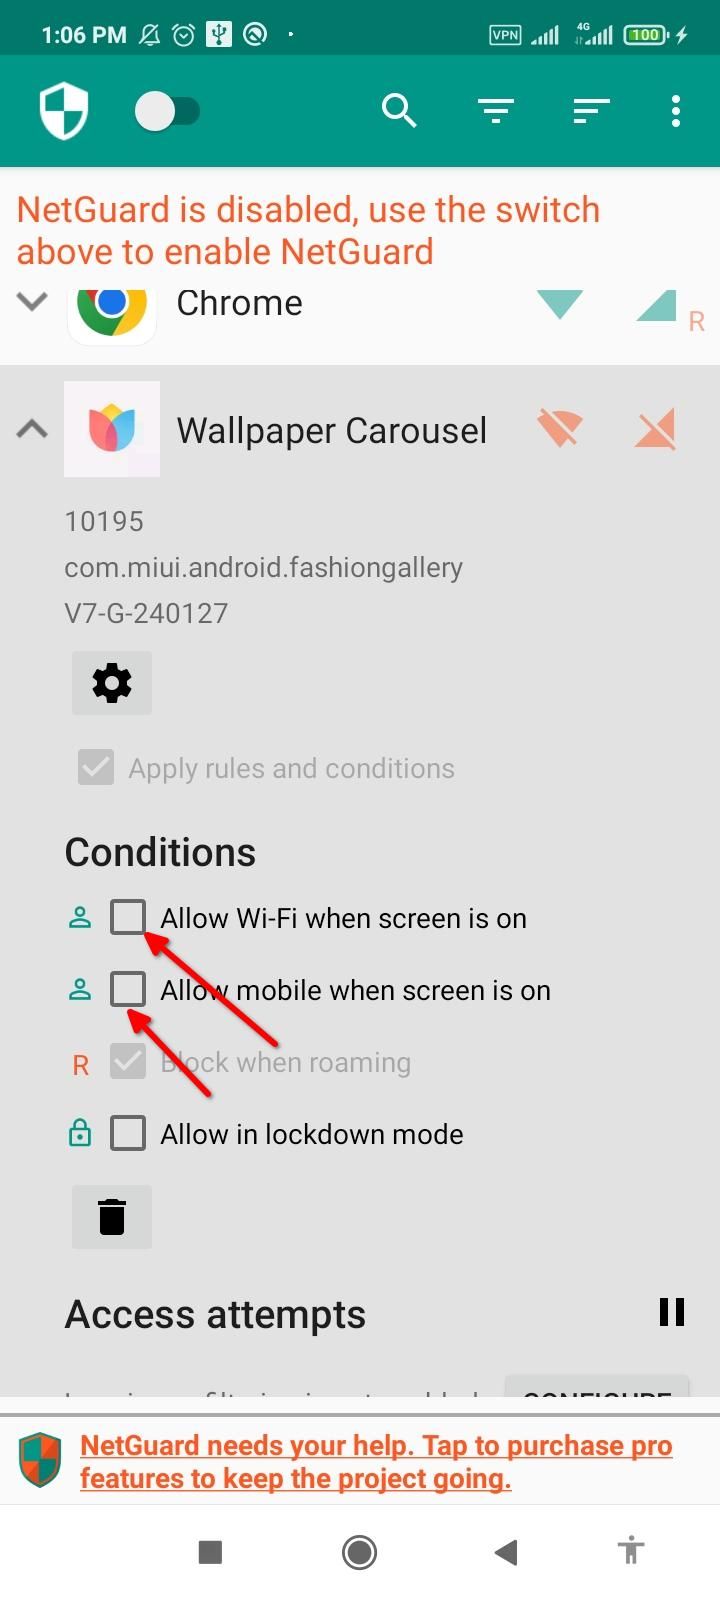
Tap an app’s name to reveal more settings. If you only want to block an app’s background internet usage, you can configure that here. Enable “Allow Wi-Fi when screen is on,” “Allow mobile when screen is on,” or both to restrict background use.

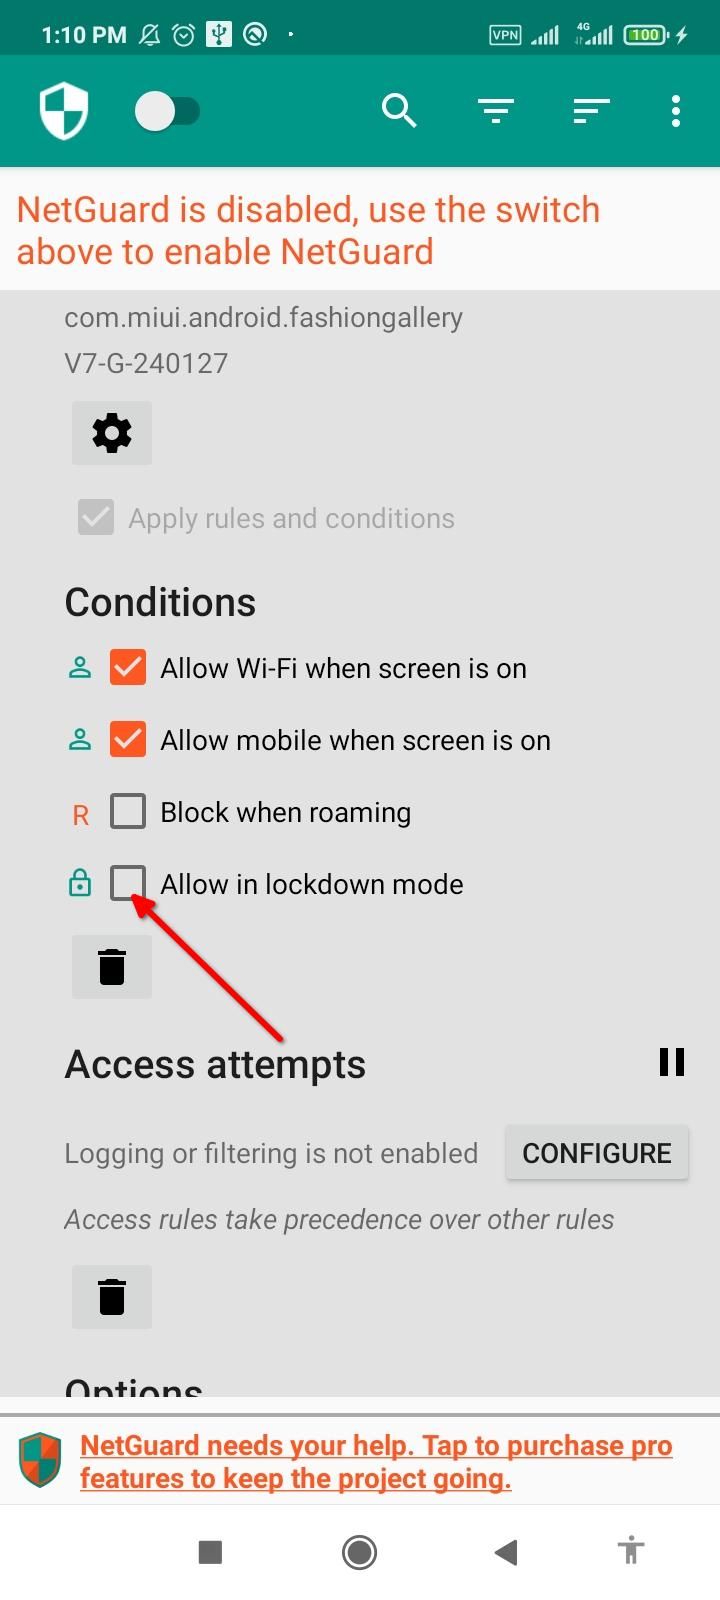
You can skip this step if you don’t want to use the lockdown feature. To exclude an app from lockdown mode, enable “Allow in lockdown mode” under the Conditions section. You can trigger lockdown by tapping the three-dot menu and enabling “Lockdown Traffic.” The red lock icon next to an app shows that it’s currently locked down. You can exclude as many apps as you want.

With the apps correctly configured, we’re ready to use the NetGuard service. Simply toggle the master switch to activate NetGuard. You might see a pop-up asking you to disable battery optimization for NetGuard. It’s a good idea to run NetGuard without interference from Android’s battery saver mode. Just tap “OK” and select “All Apps” from the drop-down menu. Locate NetGuard on the list and tap it. Finally, select “Don’t Optimize” and tap “Done.”
NetGuard should be up and running once you’ve toggled the master switch.
Some Pro Tips
Instead of blocking apps one by one, you can use the Blacklist and Whitelist features in NetGuard. Tap the three-dot menu and open Settings. Here, tap “Defaults” and enable “Block Wi-Fi,” “Block Mobile,” or both to apply the blocking to all apps. You can just block all apps from using the internet in the background. Tap “Apply when screen on rules” to whitelist apps while the screen is on. You also get separate controls for Wi-Fi and mobile data that apply globally.
What makes NetGuard truly powerful is that it can also block system apps. Open Settings, tap “Advanced Options,” and enable “Manage System Apps.” After that, every single system app will show up in the list, alongside user apps. Working with system apps might accidentally break some functionality if you’re not careful. Be sure you’ve figured out exactly what an app does and how to block its network access before proceeding.
It’s also a good idea to back up the NetGuard preferences you just set. That way you’ll be able to restore the settings and configurations if you ever have to reinstall the app. Open Settings from the three-dot menu and tap Backup. Select “Export Settings” and save the XML file anywhere on your device. If you ever have to reinstall the app or load the same preferences on a different device, tap “Import Settings” under Backup and pick the XML backup file. Your custom preferences will be automatically applied.
With that, you have everything you need to cut off any app’s internet access.

Tyler Fields is your internet guru, delving into the latest trends, developments, and issues shaping the online world. With a focus on internet culture, cybersecurity, and emerging technologies, Tyler keeps readers informed about the dynamic landscape of the internet and its impact on our digital lives.

